Page 2 of 3
Re: 3D printing a PKE Meter for my son's halloween costume (arduino based with source added)
Posted: September 4th, 2018, 2:07 pm
by Lempo
Hello Count, I have a little problem with the code... Since i've put everything together inside my 3d printed shell I have the problem that the Buttons don’t respond like they should... I can select the pattern and if I would like Sound... And if I press a button again it starts right from the beginning and didn't toggle between slow, fast and faster... Any idea what can cause this? Sorry for bothering you, but as I mentioned I am an absolute arduino noob, this is my first arduino build ever...
Greetings from Germany
Re: 3D printing a PKE Meter for my son's halloween costume (arduino based with source added)
Posted: September 4th, 2018, 2:50 pm
by CountDeMonet
It sounds like it might be resetting and going back to the configuration? Is that was is going on? I have not had a chance to install the latest code on my PKE yet. I'll try to do that tonight and take a look.
Re: 3D printing a PKE Meter for my son's halloween costume (arduino based with source added)
Posted: September 4th, 2018, 3:15 pm
by CountDeMonet
I installed the code in my PKE and as it was written it worked but the selections were backwards. I updated the code in the repo to use the correct button and mode. Other than that the code worked fine. Could you explain what you mean by starts right at the beginning?
Re: 3D printing a PKE Meter for my son's halloween costume (arduino based with source added)
Posted: September 4th, 2018, 3:30 pm
by Lempo
When I am past selecting pattern and Sound and press a Button again, it resets to the question which pattern I would like to use and than the question if Sound should be enabled... So I am stuck in a "selection loop"...
I will try your New Code tomorrow and give Feedback then...
Thank you for your help

Re: 3D printing a PKE Meter for my son's halloween costume (arduino based with source added)
Posted: September 5th, 2018, 7:38 am
by CountDeMonet
Are you using the buck converter? If not the draw from the servo could be causing the voltage to sag and the arduino to reset. I had that happen to me before I added the buck converter. That's why the original oshpark board design had the capacitor. It needed it to keep the voltage from sagging but ultimately I decided to power the servo separately.
Re: 3D printing a PKE Meter for my son's halloween costume (arduino based with source added)
Posted: September 5th, 2018, 1:56 pm
by Lempo
That was the problem, thanks... I must have forgotten to set the buck Converter to 5v... Now everything works as it should... Thank you again for your help... Much appreciated...
Re: 3D printing a PKE Meter for my son's halloween costume (arduino based with source added)
Posted: September 6th, 2018, 9:28 am
by CountDeMonet
Glad you got it working.
Re: 3D printing a PKE Meter for my son's halloween costume (arduino based with source added)
Posted: May 2nd, 2019, 7:51 am
by Shane Hultquist
Hi there, I know it's been a while since someone posted in this thread.
I'm about to start working on my PKE meter and was going to order the PCBs to have them on hand. I grabbed the code from Github, but when I uploaded it to OSH, it didn't take and said there was an error in it.
Has anyone else ordered from there?
And thanks for all the work you've done on this! It's amazing!
Re: 3D printing a PKE Meter for my son's halloween costume (arduino based with source added)
Posted: May 2nd, 2019, 1:01 pm
by CountDeMonet
Make sure you upload the LED_board.brd file. I just tried it and oshpark accepted it. Can't believe it's the same price.
We detected a 2 layer board of 0.73 x 0.96 inches (18.6 x 24.4mm)
3 boards will cost $3.50
I don't know how they can keep it so cheap. Love that place.
Re: 3D printing a PKE Meter for my son's halloween costume (arduino based with source added)
Posted: May 30th, 2019, 11:01 am
by Shane Hultquist
Got the PCBs (thanks!) and have been printing the parts. I think my Ender 3 may be a bit off as some of the parts are just falling apart. The crazy amount of supports too. Ack! I may have printed it too "fine" though (was printing at .15 and .2 mm (tried different prints) and saw you were printing at .3mm.
May have to try a piece at .3 and see how it turns out. But loving working on the build even if it is frustrating at times

Re: 3D printing a PKE Meter for my son's halloween costume (arduino based with source added)
Posted: May 30th, 2019, 11:24 am
by CountDeMonet
If your parts are falling apart you are probably suffering from under extrusion. There are some tips on this site to help with issues like this
https://www.simplify3d.com/support/prin ... eshooting/ I printed mine at .3 for speed and then ended up just using that one. If printing for a final version where I wanted minimal finishing work I'd look at .2 - .24. There are not a lot of details to worry about so it really comes down to reducing the layer striations near the top. There are a lot of supports needed unfortunately. Most slicers have a tree support option which you could try once you get the under extrusion solved.
Re: 3D printing a PKE Meter for my son's halloween costume (arduino based with source added)
Posted: May 31st, 2019, 7:51 am
by Shane Hultquist
Thanks for that link! Trying a new print now to make sure it all works out.
Also, I tested my circuit last night and all looks good! Now to finalize the print and put it all together!
Re: 3D printing a PKE Meter for my son's halloween costume (arduino based with source added)
Posted: June 6th, 2019, 7:02 am
by Shane Hultquist
Printing went well. Now to assemble! I did notice in my testing, the OLED screen (I bought it from Amazon, identical) isn't showing things very well. It is hard to read the text that pops up for light style and sounds. I'm wondering if I perhaps have a bad piece and should order a new one or not. Mine just looks "stretched" for some reason (the bar graph and circle are stretched beyond the bottom). Gonna double check the code and stuff though and hope for the best...
Re: 3D printing a PKE Meter for my son's halloween costume (arduino based with source added)
Posted: June 6th, 2019, 7:36 am
by CountDeMonet
That is really odd. I would return it and get another one. Do you have a link for the screen you bought?
Re: 3D printing a PKE Meter for my son's halloween costume (arduino based with source added)
Posted: June 6th, 2019, 8:07 am
by Shane Hultquist
This post may contain an affiliate link that helps support GBFans.com when you make a purchase at no additional cost to you.This is the one I bought.
https://www.amazon.ca/gp/product/B01N78 ... UTF8&psc=1
Re: 3D printing a PKE Meter for my son's halloween costume (arduino based with source added)
Posted: June 6th, 2019, 8:44 am
by CountDeMonet
That certainly looks similar but it looks like the company has written their own library for it
https://mega.nz/#F!vJF3XLiD!wwS9qY7zUurZvg_KxFVaeQ You may have to use their libs for things to work correctly. Try the adafruit example included in the arduino ide
File -> Exampes -> Adadfruit SSD1306 -> ssd1306_128x64_ic2
if that one doesn't work properly then you'll have to do some work to figure out what's going on
Re: 3D printing a PKE Meter for my son's halloween costume (arduino based with source added)
Posted: June 6th, 2019, 9:17 am
by Shane Hultquist
Thanks for that Count! Appreciate all you have done to help me along in this process! I'm just learning this stuff, so it's good to have someone kinda point me in the right direction!
Re: 3D printing a PKE Meter for my son's halloween costume (arduino based with source added)
Posted: July 15th, 2019, 3:43 pm
by Shane Hultquist
Wanted to give an update. I ordered 2 new DIY Mall OLEDs to ensure I had the right things, but still get the same effect when powering them up (like the font is off on them or something). I'm now soldering the lights into the wings of the PKE and then will start assembling. I couldn't get a AAA battery insert for the handle, so I will probably just put a 9V in there and wire it up. I hope that will work...
Re: 3D printing a PKE Meter for my son's halloween costume (arduino based with source added)
Posted: July 15th, 2019, 4:11 pm
by CountDeMonet
This is from a doc linked from the diymall website
http://www.diymalls.com/IIC-OLED-SSD1306https://drive.google.com/open?id=1qkexP ... 4F-JEKkrHZ that document zip contains special versions of the adafruit libs
For 0.96 inch: 0.96 inch use SSD1306 drive chip. Copy "Adafruit_SSD1306.h" and
"Adafruit_GFX.h" into "x:\arduino-1.X.X\libraries".
In order to reduce the pins’ number, we use a hardware RESET system. So the
standard library form Adafruit or u8glib may not very suitable. Make sure you are
using our provided libraries, It’s very important. If those files already in you
libraries, replace it.
They also note
The dot matrix is 128 * 32
We never produced any 0.96 or 1.3 inch with 128*32 dot matrix. Open
“Adafruit_SSD1306.h”, and make sure the “#define SSD1306_128_64” is available.
Could be why you are seeing some strange things.
9v will work but you will likely see reduced run times.
Re: 3D printing a PKE Meter for my son's halloween costume (arduino based with source added)
Posted: September 28th, 2019, 6:11 pm
by verotheelf
Hi! This my very first project 3-d/circuit/arduino/ soldering project and somehow I'm almost done. The only thing I'm stuck on is the on/off switch. I bought a SPDT Toggle Switch with 3 pins and I can't get the thing to turn off. Feel like I've tried every combination. Read the instruction you had on an earlier post but still not completely sure what you're referring to. Currently I have a wire between the switch's middle pin and the positive battery pad. Am I putting the wire in the right place for the battery? Just have it mainly in the back, sort of going a little bit into the hole. My main issue is the second wire as all of the instructions online that i could find keep adding it to a part like the motor or an LED. Tried putting it on the switch's side pin and connecting to the negative battery pad, but that reset the device and didn't turn it off? Only combination that's actually caused it to react in someway, otherwise it just stays on. Don't know if it's improperly wired or if I'm not establishing a good connection (or both), but without knowing which going slightly crazy. Thank you!
Re: 3D printing a PKE Meter for my son's halloween costume (arduino based with source added)
Posted: September 29th, 2019, 7:59 am
by CountDeMonet
with the switch the center pin is the common and the outside ones correspond to the switch location. Off is when the switch is in the middle and on is on either of the edges. This allows you to toggle two different power sources on and off. You really only needed an spsp switch but the spdp switch will still work.
Easiest way to explain it is take the positive power lead, cut it, connect one side of the power lead to the middle and the other side to one of the outside pins. From that point on the center and outside pin that nothing is connected to is off and the outside pin with the connection is on.
Here are the internals of an spdt switch. It's a pretty simple rocker mechanism

Re: 3D printing a PKE Meter for my son's halloween costume (arduino based with source added)
Posted: September 29th, 2019, 5:22 pm
by verotheelf
This post may contain an affiliate link that helps support GBFans.com when you make a purchase at no additional cost to you.Thank you for the fast reply! My switch doesn't have a middle position. This what I bought on amazon:
https://www.amazon.com/gp/product/B01N7 ... UTF8&psc=1. Instead of putting the wires on the pad at the back of the batteries as I've been doing I wrapped the wire to the front to make sure it was definitely making a proper connection. This is the same place I have the wires for the positive power that goes to the nano and buck converter. Connected the other side of one wire to the middle pin of the switch and the other wire to the outside pin of the switch. Tried it with two different switches, but still didn't cut off the power. What am I missing?
Re: 3D printing a PKE Meter for my son's halloween costume (arduino based with source added)
Posted: September 30th, 2019, 6:36 am
by CountDeMonet
Can you post a picture. I'm having trouble visualizing how you have it wired. Still the middle pin should be the constant and the outside switched so the wiring should be what I said before anyway
Re: 3D printing a PKE Meter for my son's halloween costume (arduino based with source added)
Posted: September 30th, 2019, 12:09 pm
by CountDeMonet
Here's a good tutorial on switches.
https://learn.sparkfun.com/tutorials/switch-basics/all I'm surprised you say it is just on/off because it should have 3 states
Re: 3D printing a PKE Meter for my son's halloween costume (arduino based with source added)
Posted: May 28th, 2020, 5:50 am
by Steve C
CountDeMonet I'm hoping that I may ask you for some assistance. During my recent failures with modifying the spirit pke I have found your very well crafted pke. I do have experience with 3d printing soldering and wiring but I have never touched an arduino board and never really did any programming. How easy is this project for am under educated fellow like me. Also with programming is it a copy and paste type thing? If you have some step by step instructions that would be awesome. I would really love to make this but my skills stop at the arduino board.
Re: 3D printing a PKE Meter for my son's halloween costume (arduino based with source added)
Posted: May 28th, 2020, 7:37 am
by CountDeMonet
This post may contain an affiliate link that helps support GBFans.com when you make a purchase at no additional cost to you.If you are using the code as is and not changing features you just copy the code over using the arduino development environment and then follow the diagram to connect everything
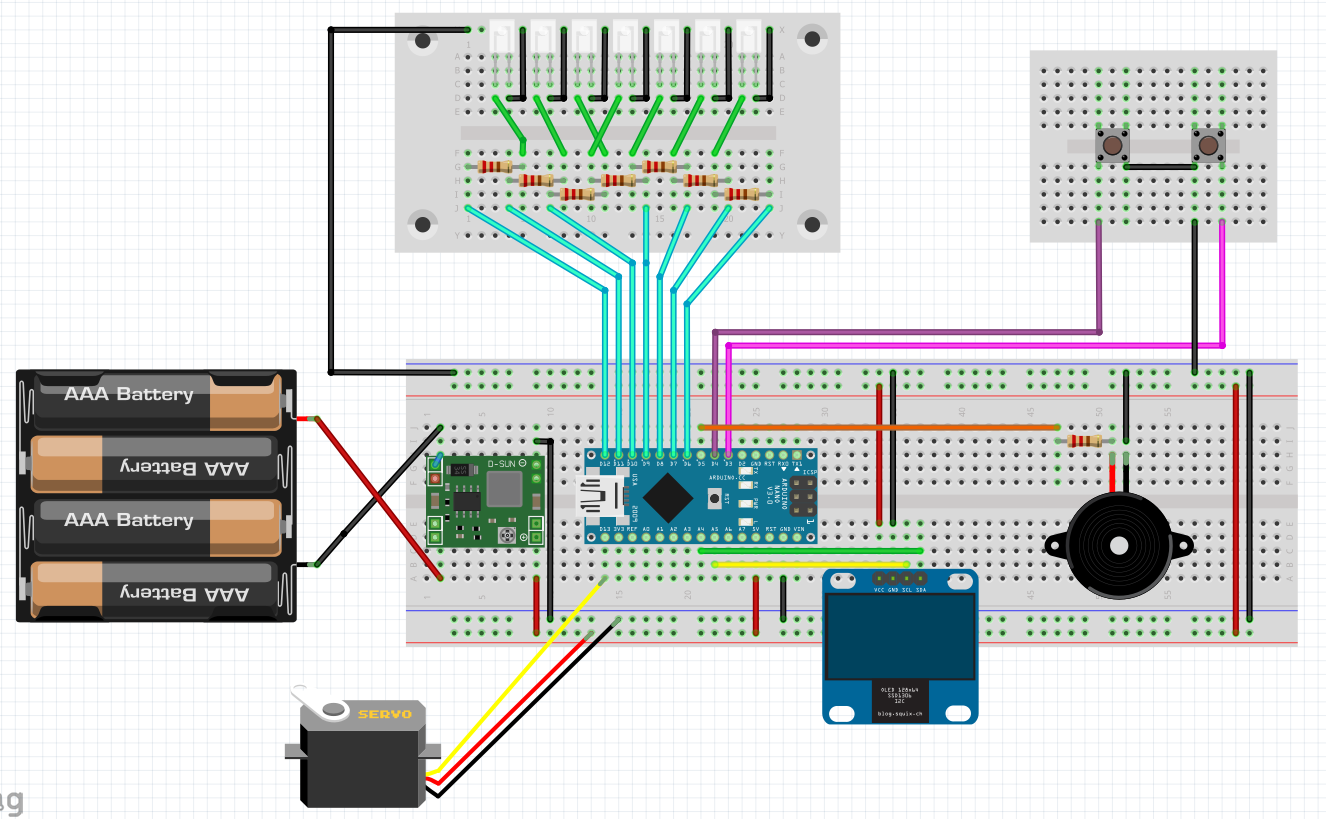
Arduinos are pretty simple devices and for a first project this one is not too bad. I tried to keep this project as simple as possible. If you were to hook up the breadboard exactly as shown and load the code it should work. Only notes of caution I would give are
1. you need to make sure the voltage from the buck converter is very close to 5 volts so you will need a multi meter for this project
2. Some of the newer screens available on amazon look the same but are not. They have custom libraries for display. I have not run into this but some other people have where the screen data is not showing properly. I think if you were to get one that has that issue there is a fork of the project on git the fixes it. Basically the newer screens have a different resolution even though they claim to be compatible.
3. Definitely recommend wire like this
https://www.amazon.com/gp/product/B01LH1G2IE cause the stuff I used was too stiff. I found this stuff after the build and all that buzzing you hear from the servo would be gone had I used this stuff.
If I was trying this for the first time I would definitely copy the breadboard setup and get it working like that before even attempting soldering and putting this into the 3d print.
I loved making this project. It was my first arduino project and I still get a kick out of it. I'm actually thinking of building another one and finishing it better. I've learned a lot about finishing 3d prints in the last 2 years and can make it much better now. Plus I made the resistor board much smaller and would probably also make one for the button board to get rid of the perf board which would clean things up a lot.
Re: 3D printing a PKE Meter for my son's halloween costume (arduino based with source added)
Posted: May 28th, 2020, 8:14 am
by Steve C
This post may contain an affiliate link that helps support GBFans.com when you make a purchase at no additional cost to you.CountDeMonet wrote:If you are using the code as is and not changing features you just copy the code over using the arduino development environment and then follow the diagram to connect everything
Arduinos are pretty simple devices and for a first project this one is not too bad. I tried to keep this project as simple as possible. If you were to hook up the breadboard exactly as shown and load the code it should work. Only notes of caution I would give are
1. you need to make sure the voltage from the buck converter is very close to 5 volts so you will need a multi meter for this project
2. Some of the newer screens available on amazon look the same but are not. They have custom libraries for display. I have not run into this but some other people have where the screen data is not showing properly. I think if you were to get one that has that issue there is a fork of the project on git the fixes it. Basically the newer screens have a different resolution even though they claim to be compatible.
3. Definitely recommend wire like this https://www.amazon.com/gp/product/B01LH1G2IE cause the stuff I used was too stiff. I found this stuff after the build and all that buzzing you hear from the servo would be gone had I used this stuff.
If I was trying this for the first time I would definitely copy the breadboard setup and get it working like that before even attempting soldering and putting this into the 3d print.
I loved making this project. It was my first arduino project and I still get a kick out of it. I'm actually thinking of building another one and finishing it better. I've learned a lot about finishing 3d prints in the last 2 years and can make it much better now. Plus I made the resistor board much smaller and would probably also make one for the button board to get rid of the perf board which would clean things up a lot.
Thank you so much I really appreciate the advice. I do have wiring and electrical knowledge,just not programming stuff. I have dealt with bucks and such as I have made vent kits for packs along with some extra pre made led light sequencers on my pack. I actually do have the same set of wire you suggested to do all the wiring on my additions to my trap. I will definitely be trying the breadboard setup first and as long as I get it working then I'll look into purchasing that PCB from Oshpark. Really hoping this turns out well because it is definitely an awesome design which by the way great work!
Re: 3D printing a PKE Meter for my son's halloween costume (arduino based with source added)
Posted: October 25th, 2020, 6:32 pm
by DarthBanana
Do you have Fusion 360 files for the models?
Re: 3D printing a PKE Meter for my son's halloween costume (arduino based with source added)
Posted: October 26th, 2020, 7:49 am
by CountDeMonet
The files I have on thingiverse are modifications of the stl files created by Hobbyman
https://www.thingiverse.com/thing:700251 I scaled it up and made some adjustments for the electronic package I am using. No source files
Re: 3D printing a PKE Meter for my son's halloween costume (arduino based with source added)
Posted: December 17th, 2020, 9:37 pm
by betchasketch
Hey Count do you think this will all fit in a Spirit PKE body? I am interested in trying this out. I completed your proton pack arduino project and gotta say a big thank you! It wasnt easy but it taught me alot of small things that I didnt know about electronics.