
- July 7th, 2020, 3:18 pm#4936847
Hello everybody
Today i'd like to share some experiences i've made, while fixing some toy-troubles for my daughter (ok, ok... a bit for myself as well
I recently came across some trouble with my...erm... our Ecto-1 from "Playmobil": since quite some time, the lights refused to turn on properly, when pushing the button - and this problem became much worse over time. The siren still goes well, but the lights needed much more of a button push and intensity and this finally came to the point, where they'de refuse to light up at all, no matter how much i've tried to press the button. Even some fresh batteries (which in many other cases may do the trick) didn't help with this one.
So i decided to check out, if there may be a solution and - well, at least for me - i found it! Plus - as i assume, this pretty easy fix might work for others as well (in case you ain't afraid of no screwdriver and soldering-iron of course )
)
Here's what i did:
First remove the roof from your ecto-1...
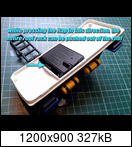
the turn it upside down and push the roofrack-assembly out of the actual roof, by pressing the latch in this direction... (shown by the arrow - yes, the batterys may remain installed and their compartment closed)
next these 6 screws need to be removed, so unscrew them (and keep them safe for later reinstallment, of course)...

...then turn it around again. The white top cover can be carefully be removed now (grab from both lightbars at the same time)...

to get access to the circuitboard and the two switches (be careful not to damage the flimsy speaker-wiring ).
).

Now take a closer look at KEY2, which is the lazy lights-switch. In my case there were only two of the four legs properly soldered to the circuitboard, and i've simply gave the other two a bit of soldering in order to make sure, these will give switch something to contact with as well. Since i've had my batteries still installed (yes - i know what you're about to say: this is a big NO-NO in general, when fixing electronic circuits...but in this case, time was precious and i was lazy ) - this can be instantly tested. Ahh - much better now already 

Now everything needs to be put together the other way round - be VERY careful, when placing the whit top cover, to make it sit properly and NOT to clamp any of the switches pins, that need to go through the housing. When putting in the screws, it's helpful to turn them left a little bit (like whe you unscrew them), until they sink in suddenly and then screw 'em in - so they won't dig into the threads wrong (which would eat up the threads, the more often you do this).
When everything goes well (as i did for me), then your Ecto-1 lights should work like fresh from the box again.

Well - all of this is at your very own risks of course, and i cannot guarantee anything, but i really hope, this method will help a few playmobil-ectos (and owners) out there, to probably be saved and brought up to blinking life again.
Please let me know, if any of you might have been successful, using this fix - best regards!
Today i'd like to share some experiences i've made, while fixing some toy-troubles for my daughter (ok, ok... a bit for myself as well
I recently came across some trouble with my...erm... our Ecto-1 from "Playmobil": since quite some time, the lights refused to turn on properly, when pushing the button - and this problem became much worse over time. The siren still goes well, but the lights needed much more of a button push and intensity and this finally came to the point, where they'de refuse to light up at all, no matter how much i've tried to press the button. Even some fresh batteries (which in many other cases may do the trick) didn't help with this one.
So i decided to check out, if there may be a solution and - well, at least for me - i found it! Plus - as i assume, this pretty easy fix might work for others as well (in case you ain't afraid of no screwdriver and soldering-iron of course
Here's what i did:
First remove the roof from your ecto-1...

the turn it upside down and push the roofrack-assembly out of the actual roof, by pressing the latch in this direction... (shown by the arrow - yes, the batterys may remain installed and their compartment closed)

next these 6 screws need to be removed, so unscrew them (and keep them safe for later reinstallment, of course)...

...then turn it around again. The white top cover can be carefully be removed now (grab from both lightbars at the same time)...

to get access to the circuitboard and the two switches (be careful not to damage the flimsy speaker-wiring

Now take a closer look at KEY2, which is the lazy lights-switch. In my case there were only two of the four legs properly soldered to the circuitboard, and i've simply gave the other two a bit of soldering in order to make sure, these will give switch something to contact with as well. Since i've had my batteries still installed (yes - i know what you're about to say: this is a big NO-NO in general, when fixing electronic circuits...but in this case, time was precious and i was lazy

Now everything needs to be put together the other way round - be VERY careful, when placing the whit top cover, to make it sit properly and NOT to clamp any of the switches pins, that need to go through the housing. When putting in the screws, it's helpful to turn them left a little bit (like whe you unscrew them), until they sink in suddenly and then screw 'em in - so they won't dig into the threads wrong (which would eat up the threads, the more often you do this).
When everything goes well (as i did for me), then your Ecto-1 lights should work like fresh from the box again.

Well - all of this is at your very own risks of course, and i cannot guarantee anything, but i really hope, this method will help a few playmobil-ectos (and owners) out there, to probably be saved and brought up to blinking life again.
Please let me know, if any of you might have been successful, using this fix - best regards!
 - By robbritton
 - By timeware
 - By prodestrian