
- September 6th, 2014, 12:54 am#4808266
For those unfamiliar with the program “GIMP”, it is a free photo editing program that can be downloaded here : http://www.gimp.org/downloads/
GIMP can be a bit intimidating for those who don’t generally use the more advanced photo editing programs, but there are hundreds of videos on youtube to help you find tools and tricks you’re looking for! For now, this is the GIMP tutorial on proton streams!
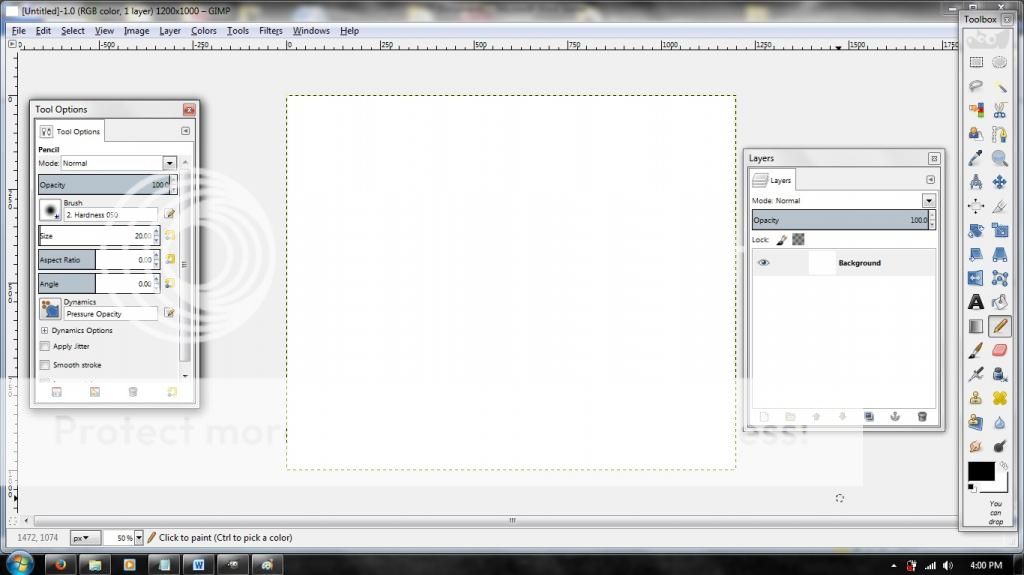
Once you have the program downloaded, go ahead and open her up! A blank window should come up where you can select File > New. You will then be prompted to select template size. It is up to you on what size you set your templates, but I like to go BIG! I generally set width to 1200 and height to 1000.
Start by making sure you have the Toolbox, Layers, and Tool Options windows. If these aren’t open when you start the program, they are found under the “Windows” tab at the top.
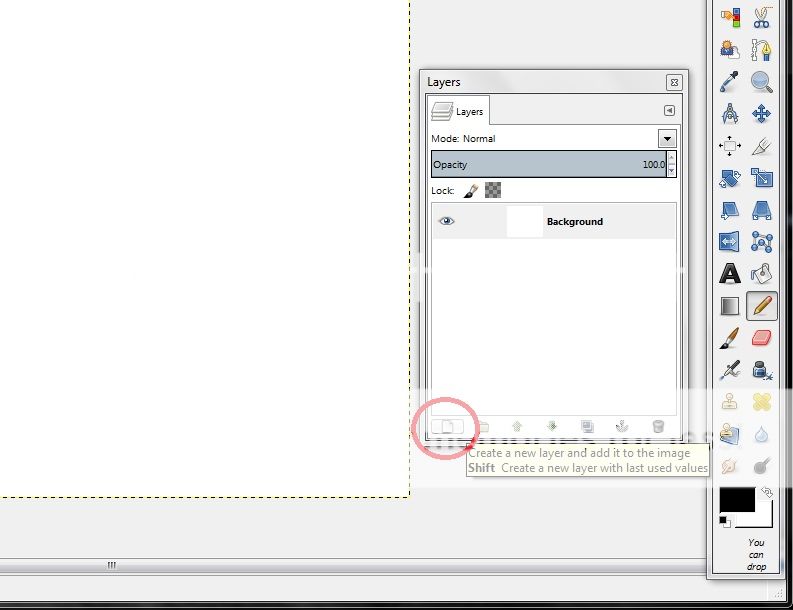
Go to your “Layers” window and create two new layers to go along with your background layer. You can name them what you want, but I like to use “Base Stream” and ”Stream Glow”:

Go ahead and select the Bucket Fill Tool (Paint Bucket) in the tool box and set the color to black. You will want to select the “Background” layer and paint it all black. If you want to add streams to your own photos, skip the paint bucket and set your photo as the background image instead.
NOTE: Remember to always have the appropriate layer selected before you do anything!
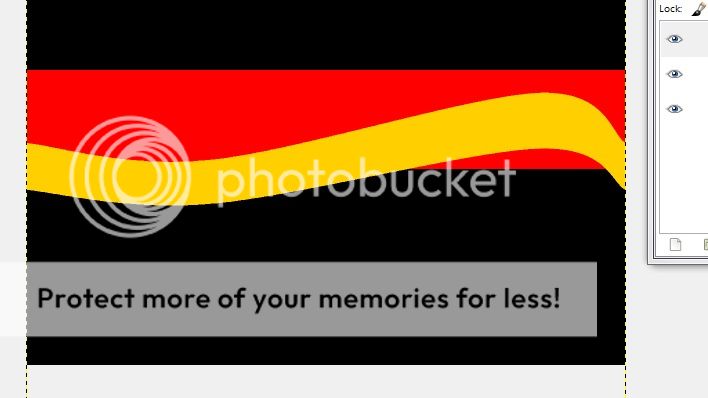
Once your background layer is painted black, select the “Base Stream” layer. Here is where you will make the bright orange portion of the proton stream. You can do this by drawing one free hand, but I like them to be perfectly straight. I do this by selecting the Rectangle Select Tool from the upper left of the tool box. Make a horizontal box that stretches from one end of your canvas to the other. Fill this box in with orange so that you have something like this:

Now select the “Stream Glow” layer and repeat the last step, only this time you want to make this box wider and paint it red.
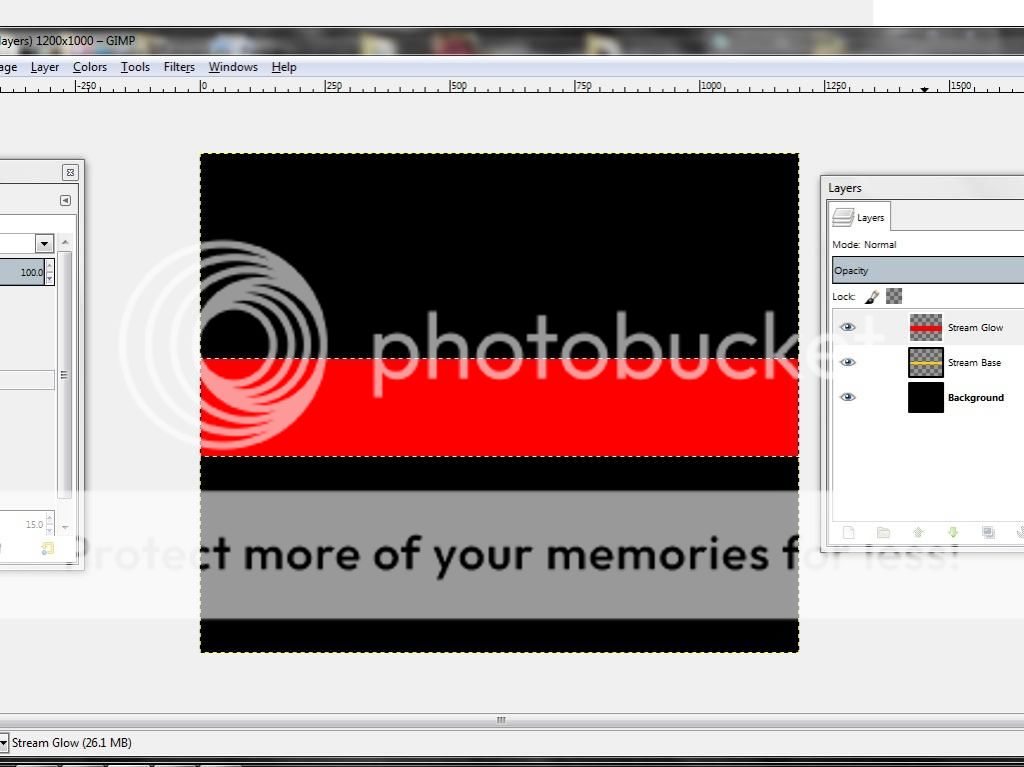
TIP: Here you may want to switch your stream layers so that the orange sits on top of the red. You also want to make sure that your select tool is no longer present on your canvas.
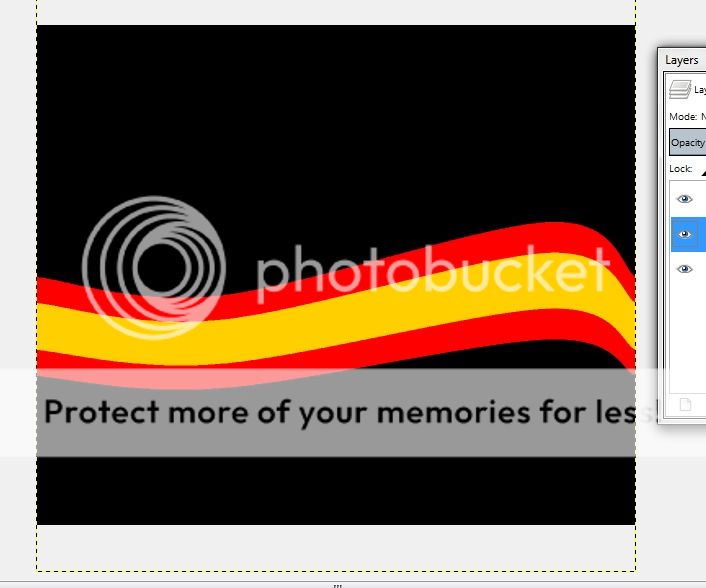
Now you will want to select your “Base Stream” layer and go to Filter > Distorts > Curve Bends. This will bring you to this window:
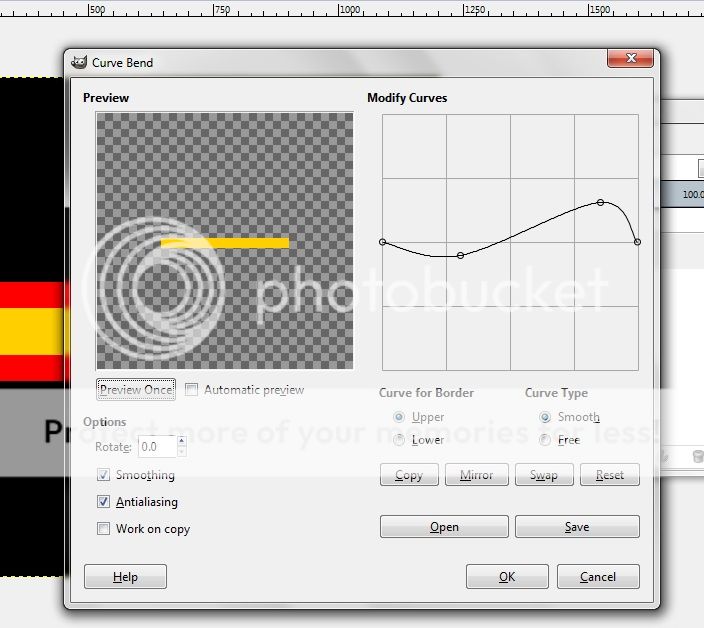
Under “Modify Curves” give the line the bend you wish to give your stream! Once you have your bend, click OK. You should have something like this:
Now select the Stream Glow layer and either go to Filters > Repeat Curve Bends, or simply hit Ctrl + F. This will repeat the same curve bend you gave the other layer.
With your Stream Glow layer still selected, head to Filters > Blur > Gaussian Blur. Go ahead and adjust the blur radius so that it gives the red some good amount of fade. This is going to give your stream that warm glow. Due to the thickness of this red line, I tend to set the blur radius somewhere between 150.0 - 200.0. Click OK.

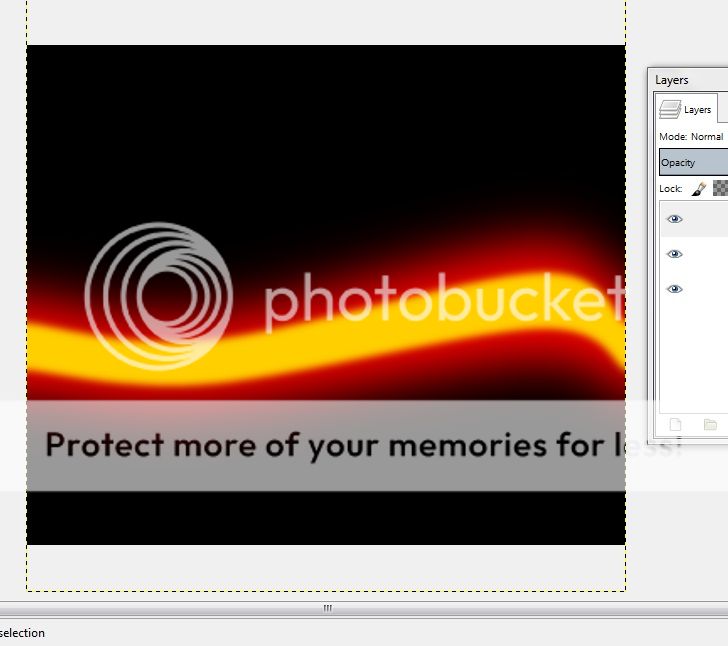
Now select the Base Stream layer and head back to Gaussian Blur. This time you will want to set it much lower. I usually set this layer to a blur radius of 20.0 – 30.0. You want this part of the beam to still be focused, but you want the edges to be less sharp so that is blends like so:
At this point, you can now go to your Layers window and merge the two beam layers. Do this by right clicking on the top beam layer and select “Merge Down”. Now you should be left with one beam layer and your background layer.
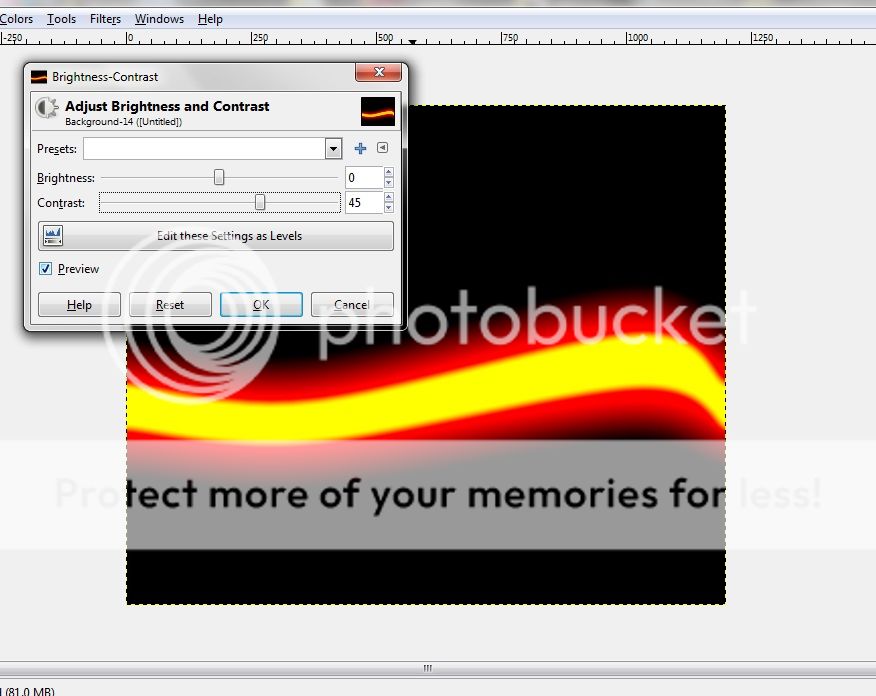
If you are happy with how your beam looks, you may choose to skip this next step. For me, I like to brighten it up a bit, so I head over to Colors > Brightness-Contrast, and adjust the contrast tab so that it brightens the stream up a bit, as well as give it some added focus.
Now I noticed in the films that the proton streams have these white orbs flowing through it. To do this, create a new layer and title it something. Mine will be titled “Inner Stream Lights” because “white orbs” didn’t come to mind until way later lol.
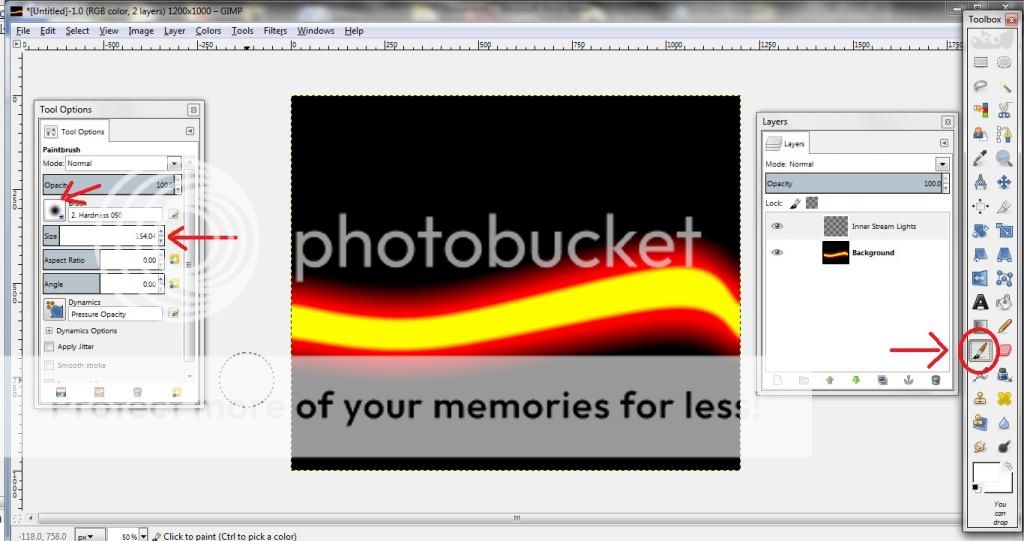
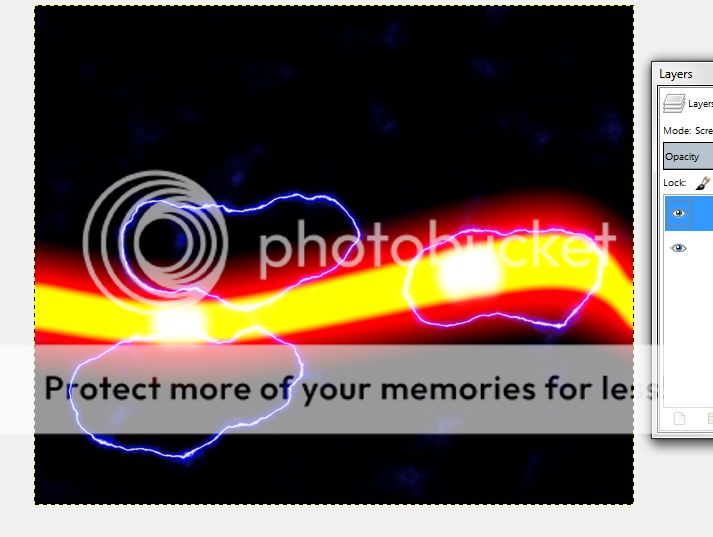
Now you will want to select the paint brush tool with the color white, and adjust the size of the brush to make it a bit wider than the stream. Then click on the brush select option (the most upper left arrow in the following photo), and select the soft/fade brush like in the photo.
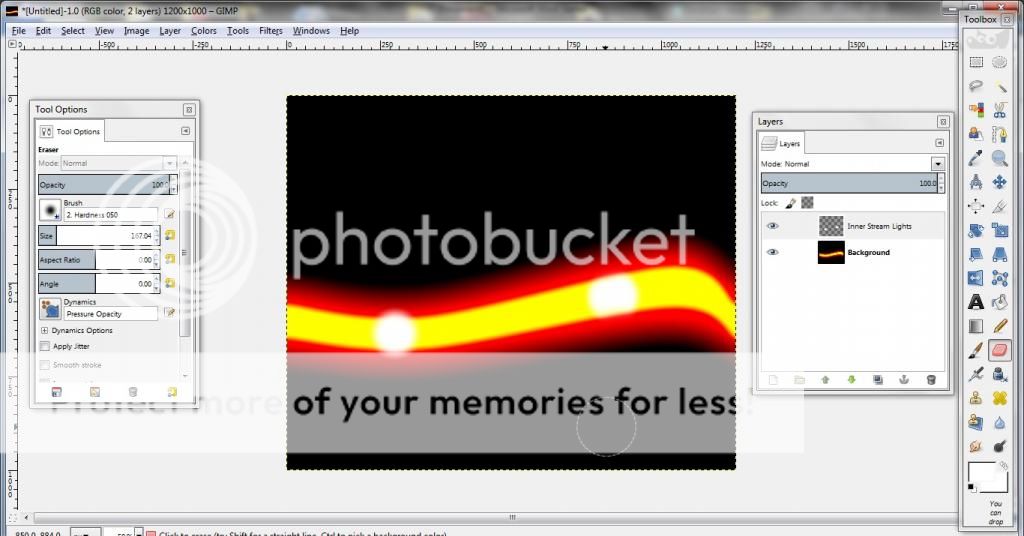
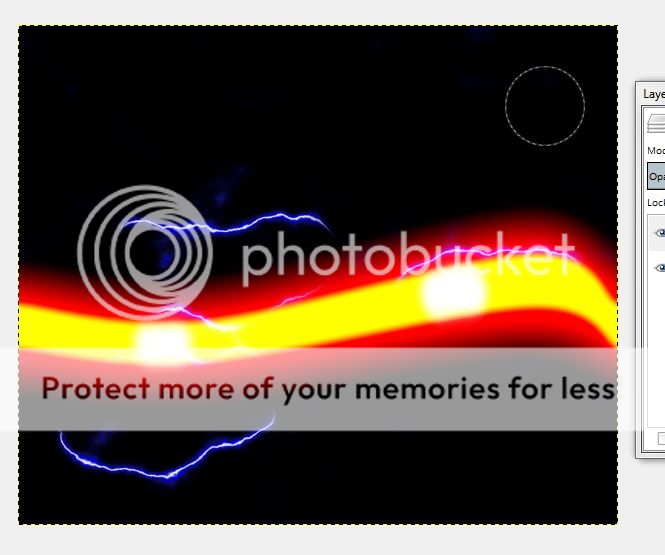
Add some white orbs wherever you wish! Once you have them added, crop the upper and lower edges using the eraser tool so that they fit within the brighter portion of the stream. The left orb in the next photo is one that was just added, and the orb on the right is what it would look like after being cropped.
Once you have the orbs done, you may either merge the orb layer with the beam layer, or do what I do and give the orbs a slight blur using the Gaussian tool before merging them. I like to make them blend a bit.
Adding the Lightning
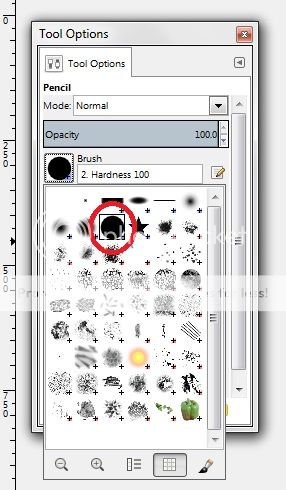
Start by creating a new layer and label it “Lightning”. Then, select the Pencil tool in the tool box and select the solid brush in the Tool Options:
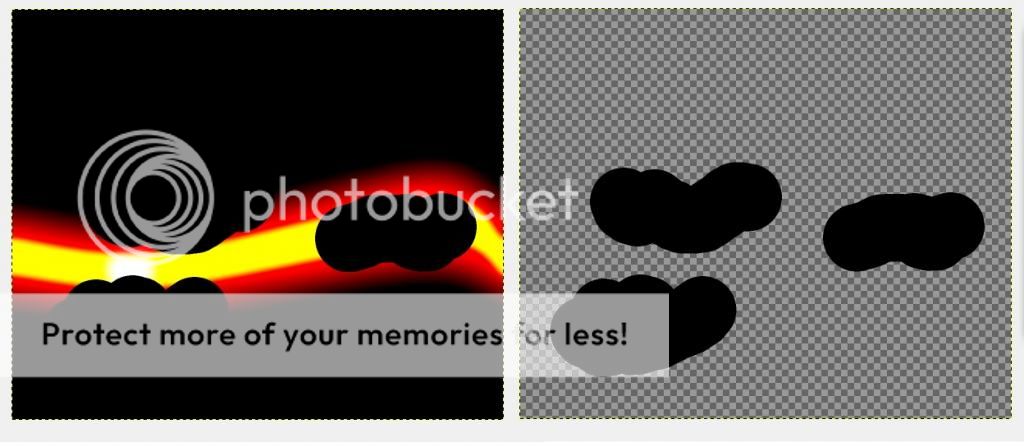
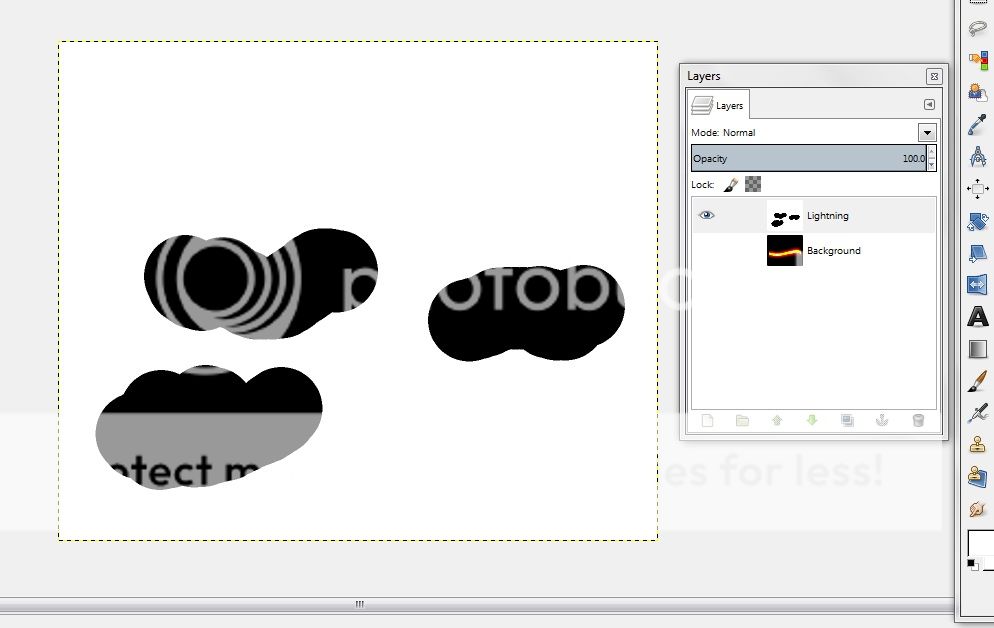
In the lightning layer, start creating black blobs where you want your lightning to go! I found that, in the films, the lightning sometimes focuses around those white orbs, so I like to focus my lightning there. Once your blobs are in place, it should look something like this:
(With stream on the left, and the right represents what you should have)
With the lightning layer still selected, use the Paint Bucket tool to fill the rest in with white so that you have this:
Head back to the Gaussian Blur tool (Filters > Blur > Gaussian Blur) and begin blurring out these blobs. I find that 55.0 – 75.0 works best here.
NOTE: The thinner the “blobs”, less blur radius! Thicker Blobs, more blur!

Next, head to Filter > Render > Clouds > Difference Cloud. Here you will want to set “Detail” to 15 and X and Y sizes to 10.0.
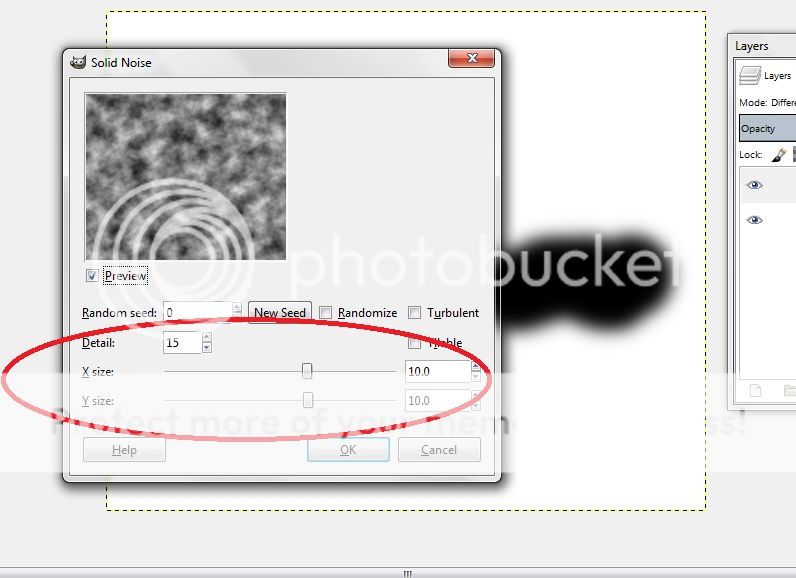
Click OK, and you should end up with something like this:
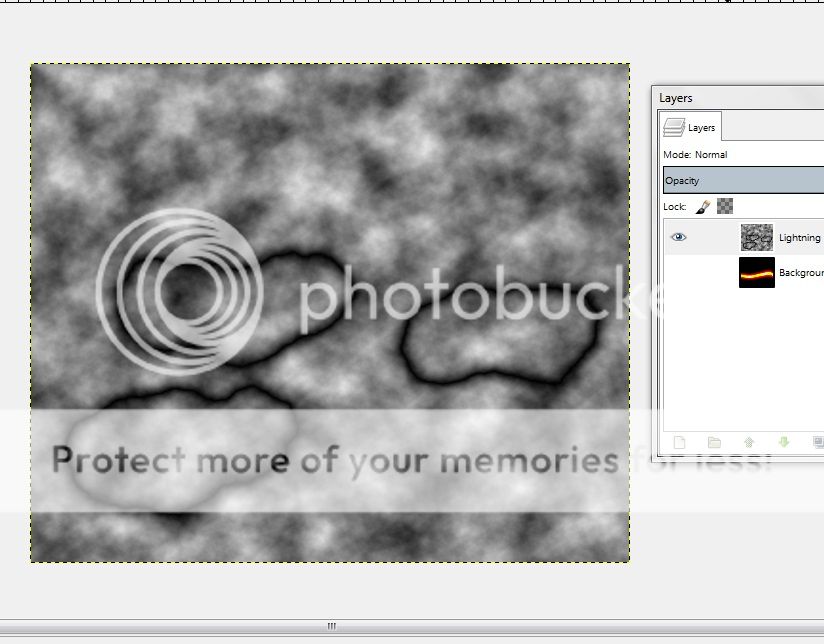
Next you will want to go to Colors and click “Invert”. Once you’ve done that, head to Colors > Levels. Take the arrow/triangle circled in the following photo and drag it allllllllllllllllllllllllllll the way over to the right and click OK!
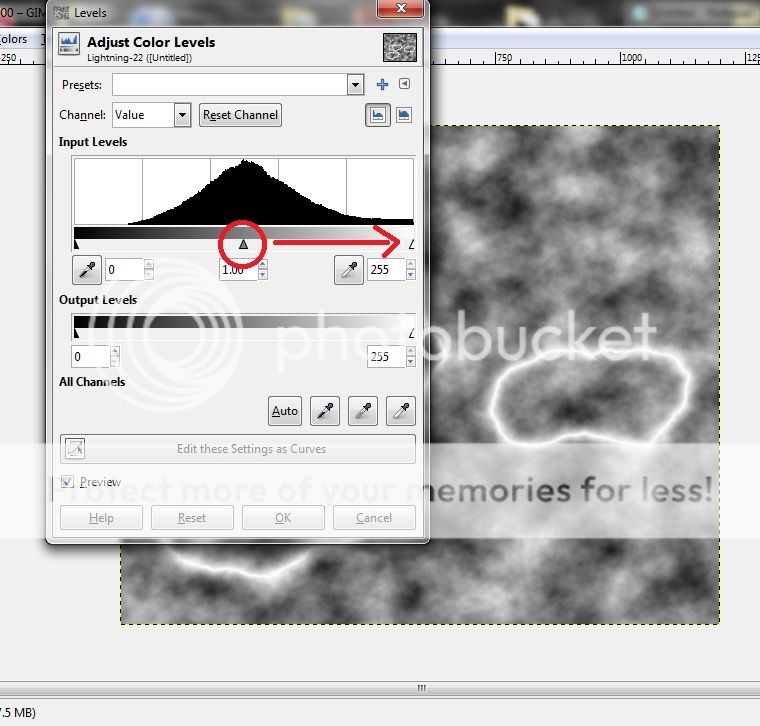
You should now have something like this:

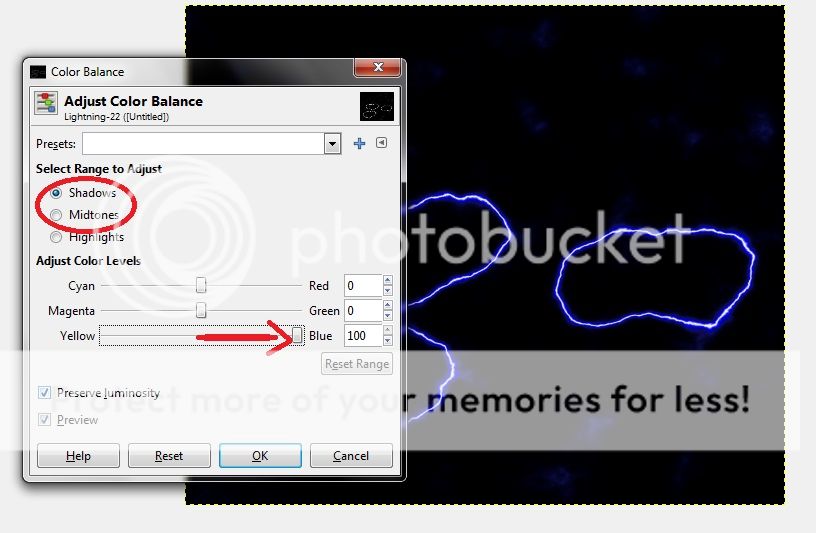
Next, go to Colors > Color Balance. Go through and set both Shadows and Midtones to Blue 100. Click OK.
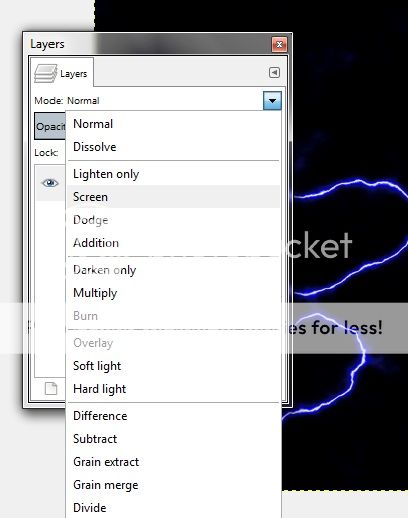
Now you will want to go to your Layers window and set Mode to Screen. This will bring your proton stream back into the picture.
Now, still in the lightning layer, take the eraser with the soft/fade brush setting, and clean up. I usually erase most of the “Blue Dust” surrounding the stream, but I like to leave some of what is closer to it. That blue dust just adds some detail I like. I also break up the lightning so that I end up with streaks rather than circles.
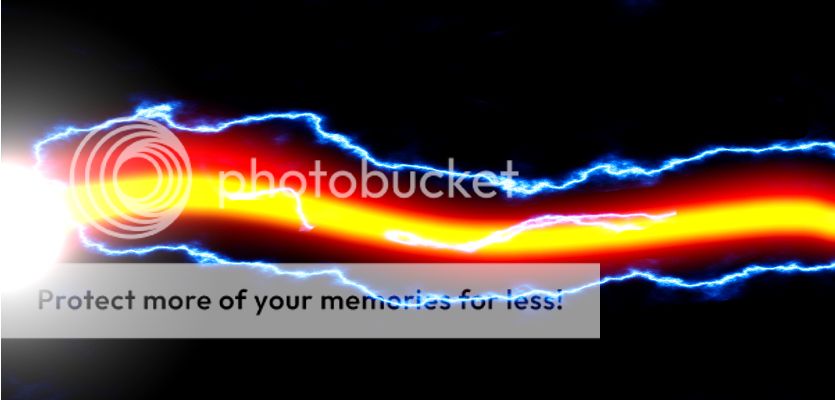
If you want to add more lightning to your stream, you can always go back and repeat the lightning steps as much you wish.
As a last touch, you can add the blast flair from the barrel of the neutrino wand. To do this, go to Filters > Light and Shadow > Supernova
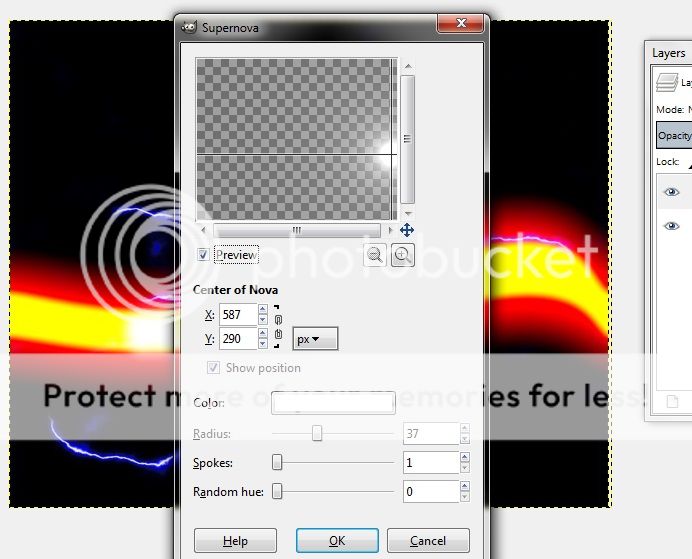
Change the color to white and adjust the settings and position. Click OK and you get this:
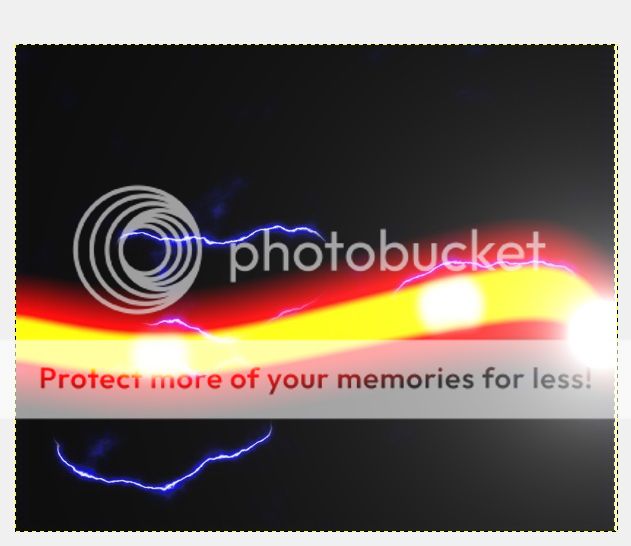
Once you practice and get the process down, a standard stream will only take you a few minutes to make!
Capture Streams
Unfortunately, there is no process to make these other than free hand. Not that I have found, anyway. You can use the same layer steps just minus the bends.
Don’t knock my proton stream in this photo, I was still pretty new to the process. lol
Perspective
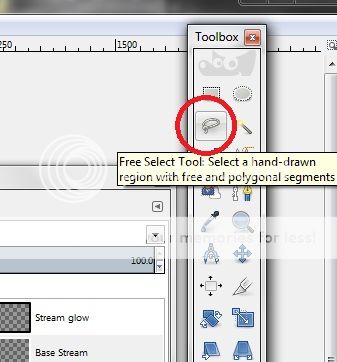
If perspective is more your speed, try this. Rather than using the Rectangle Select Tool to create the streams like before, try the “Free Select Tool”
Use the tool to create beams that get wider from one end of the canvas to another, like this:


Now head to Filter > Distorts > Curve Bends, and give your beams the curves you want. Remember, you can utilize the Ctrl+F shortcut to bend the second beam layer so you don’t have to go all the way back to the Curve Bends window.
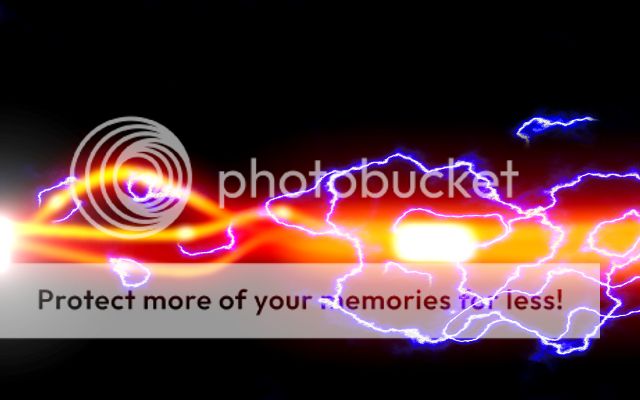
Then head to the Gaussian Blur tool (Filters > Blur > Gaussian Blur) and use the same technique as earlier in the tutorial. You should then have something like this:

Once you are here, you can follow the remainder of the tutorial above for the orbs and lightning!
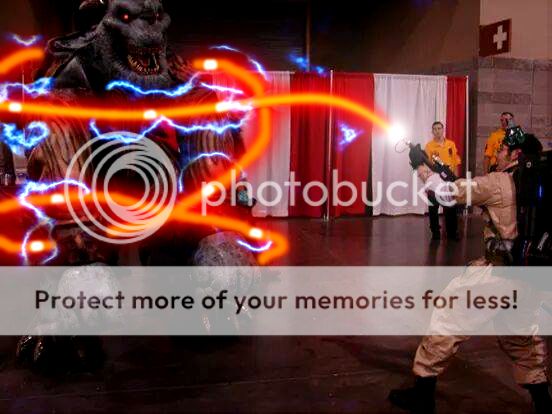
And remember, crossing the streams is BAD!
Post your pics and let me know what you think of the tutorial! Don't hesitate to ask any questions, I'll be happy to answer them to the best of my ability. Also, if anybody wants me to do a quick tutorial on adding streams to photos, let me know!
Enjoy!
GIMP can be a bit intimidating for those who don’t generally use the more advanced photo editing programs, but there are hundreds of videos on youtube to help you find tools and tricks you’re looking for! For now, this is the GIMP tutorial on proton streams!
Once you have the program downloaded, go ahead and open her up! A blank window should come up where you can select File > New. You will then be prompted to select template size. It is up to you on what size you set your templates, but I like to go BIG! I generally set width to 1200 and height to 1000.
Start by making sure you have the Toolbox, Layers, and Tool Options windows. If these aren’t open when you start the program, they are found under the “Windows” tab at the top.
Go to your “Layers” window and create two new layers to go along with your background layer. You can name them what you want, but I like to use “Base Stream” and ”Stream Glow”:
Go ahead and select the Bucket Fill Tool (Paint Bucket) in the tool box and set the color to black. You will want to select the “Background” layer and paint it all black. If you want to add streams to your own photos, skip the paint bucket and set your photo as the background image instead.
NOTE: Remember to always have the appropriate layer selected before you do anything!
Once your background layer is painted black, select the “Base Stream” layer. Here is where you will make the bright orange portion of the proton stream. You can do this by drawing one free hand, but I like them to be perfectly straight. I do this by selecting the Rectangle Select Tool from the upper left of the tool box. Make a horizontal box that stretches from one end of your canvas to the other. Fill this box in with orange so that you have something like this:
Now select the “Stream Glow” layer and repeat the last step, only this time you want to make this box wider and paint it red.
TIP: Here you may want to switch your stream layers so that the orange sits on top of the red. You also want to make sure that your select tool is no longer present on your canvas.
Now you will want to select your “Base Stream” layer and go to Filter > Distorts > Curve Bends. This will bring you to this window:
Under “Modify Curves” give the line the bend you wish to give your stream! Once you have your bend, click OK. You should have something like this:
Now select the Stream Glow layer and either go to Filters > Repeat Curve Bends, or simply hit Ctrl + F. This will repeat the same curve bend you gave the other layer.
With your Stream Glow layer still selected, head to Filters > Blur > Gaussian Blur. Go ahead and adjust the blur radius so that it gives the red some good amount of fade. This is going to give your stream that warm glow. Due to the thickness of this red line, I tend to set the blur radius somewhere between 150.0 - 200.0. Click OK.
Now select the Base Stream layer and head back to Gaussian Blur. This time you will want to set it much lower. I usually set this layer to a blur radius of 20.0 – 30.0. You want this part of the beam to still be focused, but you want the edges to be less sharp so that is blends like so:
At this point, you can now go to your Layers window and merge the two beam layers. Do this by right clicking on the top beam layer and select “Merge Down”. Now you should be left with one beam layer and your background layer.
If you are happy with how your beam looks, you may choose to skip this next step. For me, I like to brighten it up a bit, so I head over to Colors > Brightness-Contrast, and adjust the contrast tab so that it brightens the stream up a bit, as well as give it some added focus.
Now I noticed in the films that the proton streams have these white orbs flowing through it. To do this, create a new layer and title it something. Mine will be titled “Inner Stream Lights” because “white orbs” didn’t come to mind until way later lol.
Now you will want to select the paint brush tool with the color white, and adjust the size of the brush to make it a bit wider than the stream. Then click on the brush select option (the most upper left arrow in the following photo), and select the soft/fade brush like in the photo.
Add some white orbs wherever you wish! Once you have them added, crop the upper and lower edges using the eraser tool so that they fit within the brighter portion of the stream. The left orb in the next photo is one that was just added, and the orb on the right is what it would look like after being cropped.
Once you have the orbs done, you may either merge the orb layer with the beam layer, or do what I do and give the orbs a slight blur using the Gaussian tool before merging them. I like to make them blend a bit.
Adding the Lightning
Start by creating a new layer and label it “Lightning”. Then, select the Pencil tool in the tool box and select the solid brush in the Tool Options:
In the lightning layer, start creating black blobs where you want your lightning to go! I found that, in the films, the lightning sometimes focuses around those white orbs, so I like to focus my lightning there. Once your blobs are in place, it should look something like this:
(With stream on the left, and the right represents what you should have)
With the lightning layer still selected, use the Paint Bucket tool to fill the rest in with white so that you have this:
Head back to the Gaussian Blur tool (Filters > Blur > Gaussian Blur) and begin blurring out these blobs. I find that 55.0 – 75.0 works best here.
NOTE: The thinner the “blobs”, less blur radius! Thicker Blobs, more blur!
Next, head to Filter > Render > Clouds > Difference Cloud. Here you will want to set “Detail” to 15 and X and Y sizes to 10.0.
Click OK, and you should end up with something like this:
Next you will want to go to Colors and click “Invert”. Once you’ve done that, head to Colors > Levels. Take the arrow/triangle circled in the following photo and drag it allllllllllllllllllllllllllll the way over to the right and click OK!
You should now have something like this:
Next, go to Colors > Color Balance. Go through and set both Shadows and Midtones to Blue 100. Click OK.
Now you will want to go to your Layers window and set Mode to Screen. This will bring your proton stream back into the picture.
Now, still in the lightning layer, take the eraser with the soft/fade brush setting, and clean up. I usually erase most of the “Blue Dust” surrounding the stream, but I like to leave some of what is closer to it. That blue dust just adds some detail I like. I also break up the lightning so that I end up with streaks rather than circles.
If you want to add more lightning to your stream, you can always go back and repeat the lightning steps as much you wish.
As a last touch, you can add the blast flair from the barrel of the neutrino wand. To do this, go to Filters > Light and Shadow > Supernova
Change the color to white and adjust the settings and position. Click OK and you get this:
Once you practice and get the process down, a standard stream will only take you a few minutes to make!
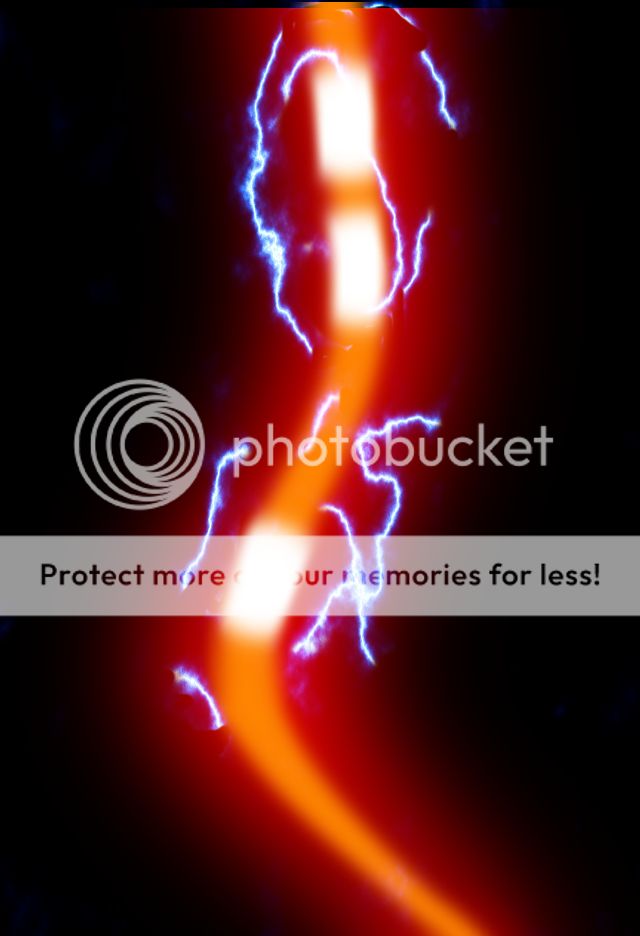
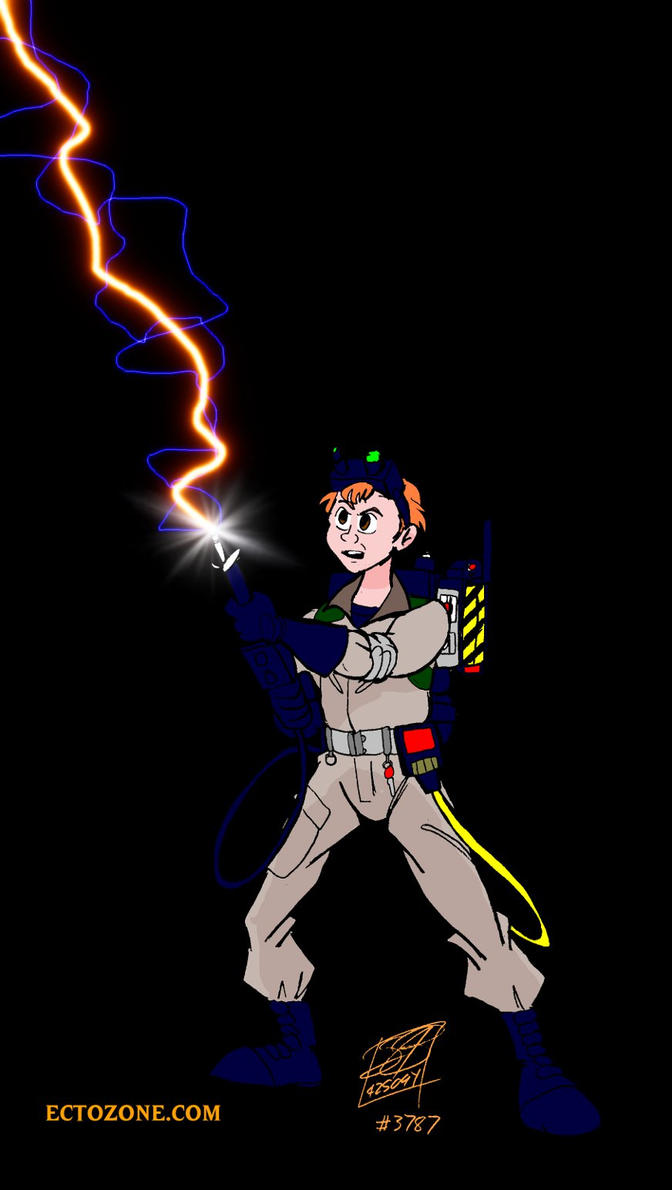
Capture Streams
Unfortunately, there is no process to make these other than free hand. Not that I have found, anyway. You can use the same layer steps just minus the bends.
Don’t knock my proton stream in this photo, I was still pretty new to the process. lol
Perspective
If perspective is more your speed, try this. Rather than using the Rectangle Select Tool to create the streams like before, try the “Free Select Tool”
Use the tool to create beams that get wider from one end of the canvas to another, like this:
Now head to Filter > Distorts > Curve Bends, and give your beams the curves you want. Remember, you can utilize the Ctrl+F shortcut to bend the second beam layer so you don’t have to go all the way back to the Curve Bends window.
Then head to the Gaussian Blur tool (Filters > Blur > Gaussian Blur) and use the same technique as earlier in the tutorial. You should then have something like this:
Once you are here, you can follow the remainder of the tutorial above for the orbs and lightning!
And remember, crossing the streams is BAD!
Post your pics and let me know what you think of the tutorial! Don't hesitate to ask any questions, I'll be happy to answer them to the best of my ability. Also, if anybody wants me to do a quick tutorial on adding streams to photos, let me know!
Enjoy!
Ecto-1 fan, DaveLister liked this


 - By prodestrian
 - By mrmichaelt
 - By RiverofSlime